Bereich Simulationen/en: Unterschied zwischen den Versionen
Keine Bearbeitungszusammenfassung |
Keine Bearbeitungszusammenfassung |
||
| Zeile 90: | Zeile 90: | ||
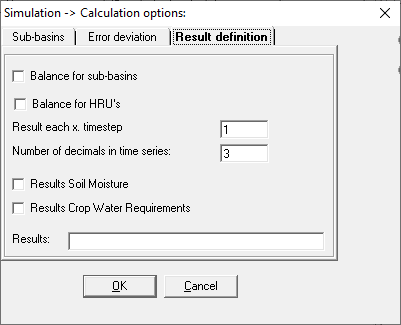
Under '''Initial Conditions''' the initial conditions set in the individual system elements can still be globally scaled. Under '''further options''' the following windows open in addition to the calculation options, in which you can define specifications for the catchment area, error deviations and result output. For the result output it is important in which resolution you want to have the results. For example, if you calculate on a 2 hour basis, but a result output of 1 day is sufficient, enter 12 ''' for every nth time step in the ''' output. Then only every 24 hours a value will be output, as average of the 12 calculated 2 hour values. | Under '''Initial Conditions''' the initial conditions set in the individual system elements can still be globally scaled. Under '''further options''' the following windows open in addition to the calculation options, in which you can define specifications for the catchment area, error deviations and result output. For the result output it is important in which resolution you want to have the results. For example, if you calculate on a 2 hour basis, but a result output of 1 day is sufficient, enter 12 ''' for every nth time step in the ''' output. Then only every 24 hours a value will be output, as average of the 12 calculated 2 hour values. | ||
[[Datei: | [[Datei:Simulation004_EN.png|Datei:Simulation004_EN.png]] [[Datei:Simulation005_EN.png|Datei:Simulation005_EN.png]] [[Datei:Simulation006_EN.png|Datei:Simulation006_EN.png]] | ||
Under Name you can rename the simulation and add a comment. | Under Name you can rename the simulation and add a comment. | ||
Version vom 26. November 2020, 11:08 Uhr
A simulation is automatically created in the project manager, when a scenario is created, copied or imported. When creating a new scenario, an empty simulation is created, whereas when copying or importing a scenario, the settings (e.g. simulation period) of the original simulation are adopted. To add a new simulation to an existing scenario, you can either create a new simulation or add an already existing simulation through copy and paste.
When running a simulation, input variables and results are stored in the simulation and can be viewed via load results. It is recommended not to change the flow network map when executing several simulations in one scenario, but to only to change simulation settings or to adjust single parameters or input variables and to document the adjustments.
The following columns are filled for each simulation:
| Name | Name of the simulation. It is important to choose a clearly identifiable name e.g. used calibration parameters or changes in the flow network. |
| ID | Identification number of a simulation. When evaluating simulations, it is recommended to always note the simulation ID, in order to quickly find the corresponding scenario and simulation when working on large projects. |
| Simulated on | Date and time on which the simulation was run. |
| from | Date and time of simulation start. |
| to | Date and time of simulation end. |
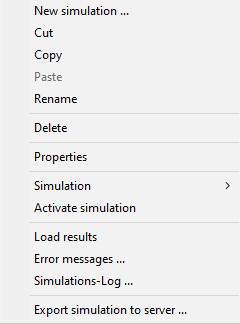
Right-click on the simulation name to open the following context menu:
| New simulation | A new, empty, and inactive simulation is created. |
| Cut | The selected simulation is cut out and can be pasted to another scenario. |
| Copy | The selected simulation is copied and can be pasted to the current or any other scenario. |
| Paste | After having cut or copied a simulation, it is inserted in the selected scenario. |
| Rename | The name of the selected simulation can be changed. |
| Delete | The selected simulation is deleted. This operation cannot be undone. Caution: If the activated simulation has been deleted, the scenario cannot be copied or exported before activating another simulation. |
| Properties | A window, in which the simulation settings can be edited, opens. |
| Simulation | Further submenu items appear:  
|
| Activate simulation | The selected simulation becomes the active simulation ( |
| Error messages | |
| Simulations-Log | |
| Export simulation to server | The results of the selected simulation are exported to the server and assigned to a scenario. |
Create New Simulation
A new simulation is created by right-clicking in the simulations' section and selecting New simulation from the context menu. In a newly created simulation most settings are empty, however, some are filled with default values. A new simulation receives the default name New Simulation. In order to adopt the simulation settings of another simulation, it is recommended to copy that simulation and paste it as a new simulation in the desired scenario.
Activate Simulation
An active simulation is crucial when exporting and copying a scenario, as the settings and results of the active simulation are required to comlete the process. To activate the simulation, right click on it and select Activate simulation. The simulation labeled with the red check mark is the active simulation.
Edit Simulation
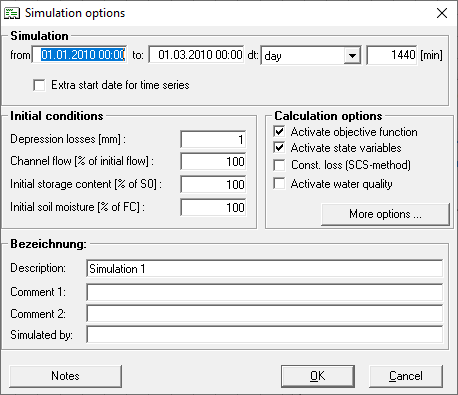
To edit the simulation settings, either right-click on the simulation and select Properties or double-click on the simulation. The following window will open:
Under Simulation, the simulation period in the format dd.mm.yyyy hh:mm, as well as the timestep, which can range between 1 minute and 1 month, are indicated. The timestep is automatically converted into minutes. For example, if you select a timestep of 1 day, it will be set to 1440 minutes.
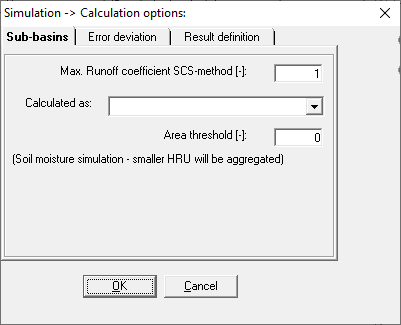
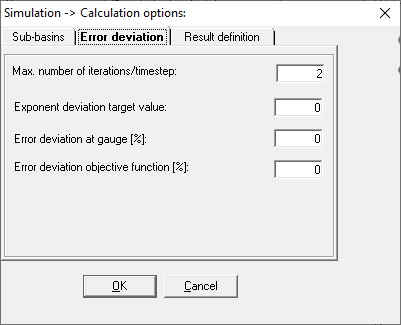
You can also make entries at Initial conditions and Calculation options. Under Initial Conditions the initial conditions set in the individual system elements can still be globally scaled. Under further options the following windows open in addition to the calculation options, in which you can define specifications for the catchment area, error deviations and result output. For the result output it is important in which resolution you want to have the results. For example, if you calculate on a 2 hour basis, but a result output of 1 day is sufficient, enter 12 for every nth time step in the output. Then only every 24 hours a value will be output, as average of the 12 calculated 2 hour values.
Under Name you can rename the simulation and add a comment.
Copy simulation
To copy the simulation, either right click on the simulation and select copy or mark the simulation with the left mouse button and press Ctrl+C on the keyboard. The complete settings of the copied simulation are taken over. Results will not be copied. You can paste the copied simulation either in the same or in a different variant. Neither the variant nor the simulation must be active.
Cut simulation
To cut the simulation, either right click on the simulation and select cut or mark the simulation with the left mouse button and press Ctrl+X on the keyboard. The complete simulation will be cut out of the variant and thus deleted in this variant. You can then paste the cut simulation into another variant. Neither the variant nor the simulation must be active.
Caution: If you insert a cut-out simulation with results into another variant, the results may not match the new Vairante, because the variant may have either a different system logic or different input parameters.
Insert simulation
If you have copied or cut a simulation beforehand, you can paste it to the new variant either by right-clicking paste or by using the key combination Ctrl+V. The variant in which you want to insert the new simulation does not have to be active.
Caution: If you insert a cut-out simulation with results into another variant, the results may not match the new Vairante, because the variant may have either a different system logic or different input parameters.
Rename simulation
You can rename the simulation by right-clicking on the simulation and selecting rename or by double-clicking on the simulation with the left mouse button.
Delete simulation
To delete a simulation, right click on the simulation to be deleted and select delete. The simulation and with it all results will be deleted irrevocably.
Export simulation to server
Start simulation
Selecting the menu item Start Simulation opens an own window in which further simulation settings can be made.
Initial conditions
Reservoir startup content
Read/write terms and conditions
Ergebnisausgabe definieren
Calibration
Error messages

